Where to Place Subject in Photography Backdrops
When shooting portraits, finding a manner to draw the viewer's attending to the subject and brand them pop out from the background is frequently a primary goal for photographers. We've all been frustrated by situations where the bailiwick seems to fade into their surroundings, making for a drab, uninteresting image. The post-obit are a few tricks which tin can exist useful in these cases to describe the middle to what'due south important in the frame.
i. Shallow Depth of Field
This method is probably the well-nigh familiar to photographers as information technology'due south ofttimes a major selling indicate of wide aperture lenses, and y'all've surely read "fantabulous field of study isolation" in the featured bullet points of your favorite fast primes. Essentially, by limiting your depth of field, you can maintain sharpness on your subject field and pleasantly blur out the groundwork into creamy, dreamy bokeh.

There are a few factors that come up into play when attempting to limit your depth of field. The master consideration is the aperture you choose, simply the sensor size, focal length, and distance between discipline and camera besides come into play. In reality, sensor size and focal length are just two sides of the same money. With the distance remaining constant, an 85mm will deliver the same depth of field on a full frame sensor every bit an APS-C sensor, it volition just exist the field of view that changes, turning your medium close-up into a tighter headshot.
Unremarkably, if you want to use this method, you'll desire to pick a lens with a longer focal length, at least 50mm, considering the longer the lens the shallower the depth of field. However, the distance betwixt camera and subject also plays a major function. It's possible to create a lovely blurry background with a 24mm lens, provided that you open the aperture, and get shut to your subject- the closer the discipline, the shallower the DoF. However, use this detail method with caution when shooting portraits, as wide angle lenses, shot close-upward, can distort your subject'due south features.
two. Contrasting Brightness

Selective lighting is a classic means of leading a viewers eye through an prototype. The simplest mode to attain this is by lighting your subject and letting the background remain slightly underexposed. Alternately, however, yous tin flip this equation, place your discipline in front of a bright, over-exposed background, and let your subject exist the darkest object in the frame, essentially creating a silhouette await.
If yous notice yourself in a natural-calorie-free situation where you lot can't light your subject and groundwork separately, y'all tin can achieve a similar effect with your choice of wardrobe (in portraiture) and background. Putting your model in a low-cal-colored outfit, in front of a dark background, (or vice-versa) even if they're existence lit as, will create enough contrast to separate them.
3. Contrasting Colors
If y'all have a basic agreement of color theory, you can use it to create separation. If you don't have a basic understanding of color theory, you should do a trivial reading. Commencement here:
Intro To Color Theory & Practical Tips | A True Divisor Between The Pro & Apprentice
If separation is the goal, yous'll want to call up in terms of complimentary colors. Putting your model in a blood-red clothes in a green field, or a yellow shirt in front end of a blue sky, (etc.) will create visual interest, and draw the viewer's middle to the subject field. Thinking in more basic terms, mixing warm colors with cool colors will generally get you shut to the target.

Likewise in this category, y'all tin vary the saturation of the colors used. If you're shooting somewhere with lots of grayish, muted colors, you can dress your model in an outfit or accessory with a bright pop of color to draw attention. Even if the bones color of the groundwork and discipline are the same, putting the subject in the brightest colour in the frame will brand him/her popular. I should add a brief addendum: I do non disregard or recommend using the "selective colour" feature on your camera, or artificially desaturating everything but one color.
4. Edge Lighting

If it fits the style you're going for, you lot can create separation by adding an edge lite, or dorsum light. This will substantially outline your subject with lite against the background. When working with natural lite, you tin can simply put the sun backside your field of study, or you can create the same consequence with a strobe or speed light. With artificial low-cal, yous'll have greater control over the result, as irresolute the angle of the low-cal will adjust how much it wraps around your field of study, and varying the power of the light will alter it'south impact. Also, using a bare strobe will cast a hard, crisp outline, while calculation a modifier will soften the effect, and give you lot a more gradual transition from light to dark.
v. Motion Blur
This method will depend on what or whom you're shooting, but in certain circumstances y'all tin can creatively 'drag the shutter' to blur the groundwork while maintaining a relatively sharp focus on your subject. The end effect will be somewhat similar to shooting with a shallow depth of field (and the 2 tin be used together) only this one will yield some interesting, streaky bokeh.

There are 2 means to accomplish this expect. In either case, you lot'll need to pick a slightly slower shutter speed than normal- try starting around 1/tenth and dial information technology in from there. The simpler method of the two is to take your subject move laterally, (keeping on the same focal aeroplane) and then follow that movement with the photographic camera while yous take the photo, keeping them in the same place in the frame. You'll cease up with some motion blur on your subject, merely substantially less than any is behind them.
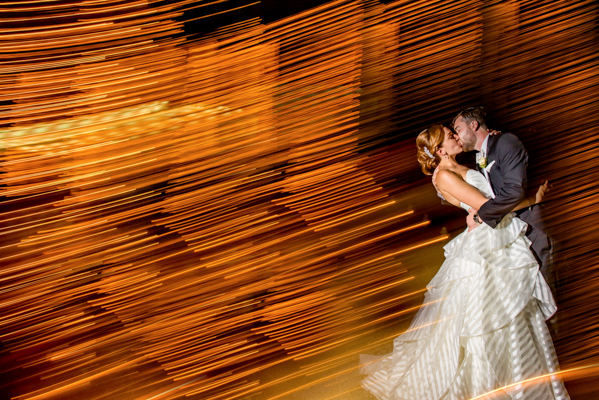
The other method requires some type of strobe or wink, and works well with an on-camera speedlight, in dark environments. One time yous've balanced your exposure, frame up your subject, then motility your photographic camera in whatever manner inspires you, and take the shot, keeping that movement going until the shutter closes. You lot can pan, tilt, twist or zoom to create dissimilar effects. This 1 is a favorite for reception photos with the good folks at Lin & Jirsa, and yous tin can see it in activeness in this curt tutorial:
How to Create Rad Reception Images: Drag Your Shutter & Light Upwards Their Party
These ideas can be used together to produce creative, eye-catching compositions. Next time you lot notice yourself in a tricky situation, you tin break into this little purse of tricks to take your images to the next level. Practice you have any other tricks along these lines to create separation? Allow us know in the comments!
To master foundation lighting techniques and some methods above, cheque out our Lighting 101 workshop, or stream it along with a plethora of photography and post-production education as an SLRL Premium member.
Comments
Post a Comment